- Download the Template shapefile(s) for your activity (see 4.2 Download templates).
- Open QGIS.
- Click Add Vector Layer
 and Browse to find the Template shapefile and click Open to add to QGIS as a layer (choose the file with .shp extension):

- Once loaded in QGIS, start an editing session by clicking Edit
 from the top tool bar (ensuring you have first clicked on the layer you want to edit to activate it).
 - Select Add Feature (polygon
 , lines
  , points
  depending on the template geometry).
 - For a line or polygon, start creating your feature by left clicking vertices on the map canvas. Right click to finish the feature (points are just a single click to the map canvas).
- For a point, select the location you want to record your data.
- An attributes dialog box will appear. Complete all the attribute details you can for the feature (check the legend to see which fields are mandatory):
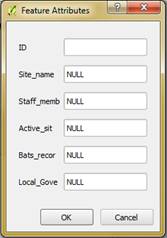
- Refer to 4.4.2 Data validation for template shapefiles for data validation rules (i.e. the full attribute names, drop down menu options, field types, mandatory fields etc.).
- Click OK.
- Repeat steps 11 to 15 until all your data is captured.
- Click Edit then Save to save all your changes.
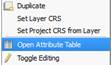
- If you need to edit attributes from the attribute table, right click on your layer name in the table of contents.
- Click Open Attribute Table:
- Click Edit from the attribute table and double click on a cell to change the details.
- Click Edit again and Save when finished.
- Continue to 4.5 Uploading your data to upload your populated Template Shapefile to GRID.